
How to shoot over/under images with expert Jordan Robins
An over/under, commonly referred to as a split shot or 50/50 is a type of ocean photo where you can see both above and below the water, brilliantly captured in a single exposure. You can see below the water in the foreground of the image and you can see above the water in the background of the image
Equipment
- A DSLR, mirrorless camera or a compact underwater camera such a GoPro.
- An underwater camera housing/case to allow you to use your camera in the water. I personally shoot with an AquaTech water housings and Isotta water housing, which have a wide selection of housings for all the major camera brands and models.
- An ultra-wide angle or fisheye lens. I personally shoot with a Canon EF 8-15mm f/4 Fisheye lens and Canon EF 16-35mm f/4 lens.
- A dome port on the front of the camera housing is essential for shooting over unders. You want to use an 8” or bigger dome. My personal favourite is a custom 12” dome made by Matty Smith.
- An underwater flash or strobes. These are essential if you are planning on shooting over unders in low light such as on sunrise or sunset. When shooting on sunrise or sunset we want to expose for the sky. By doing this below the water would be dark
and underexposed hence why the strobes are required to properly expose the scene and illuminate below the water. Shooting with strobes is a more advanced technique and I would suggest getting comfortable shooting over unders with natural light first
before experimenting with strobes. - When I am shooting over unders I will often be in the water for a prolonged period of time so I wear a wetsuit to prevent heat loss and to protect from sunburn. A mask, snorkel and fins are also required if you are planning to shoot over unders while snorkelling. Below is a list of all the equipment that I personally shoot over unders with:
List of Equipment I Shoot Over Unders With - Canon EOS 5d MK IV
- Canon EF 8-15mm f/4 Fisheye
- Canon EF 15mm f/4 Fisheye
- Canon 16-35mm f/4
- AquaTech Elite II 5d4 Underwater Housing
- Isotta 5d4 Housing
- AquaTech 8” Dome Port
- Custom 12” Matty Smith Dome
- 2x Inon Z-330 Strobes

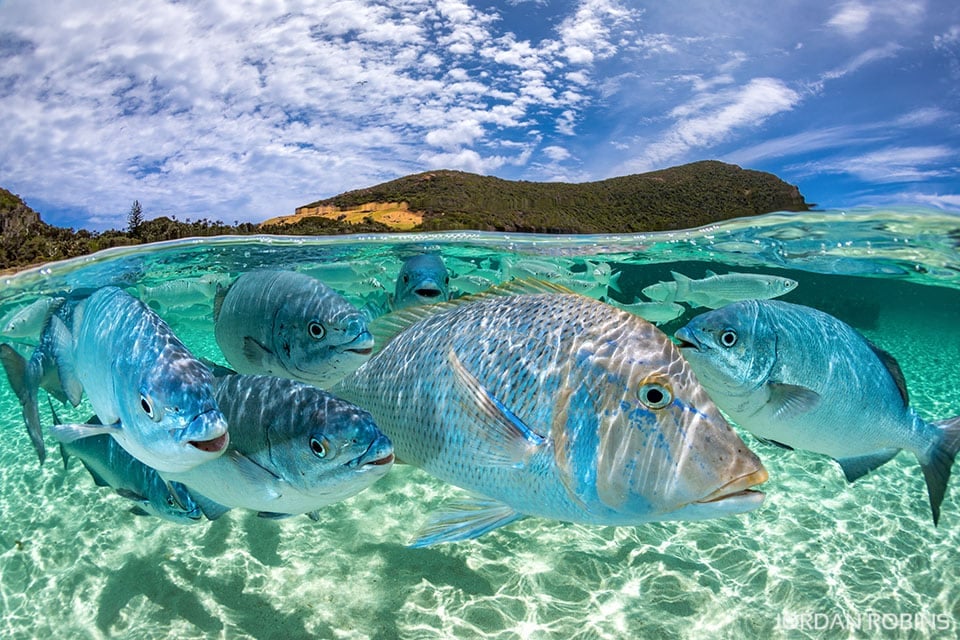
Neds Beach on Lord Howe Island.
Camera settings: f/18 | 1/250sec | ISO 160
Planning
There is a bit of planning involved with shooting over unders. Firstly, you need clear water, if the water is murky or dirty I won’t bother shooting.
A local knowledge of the area you are shooting in is also essential. A knowledge of how swell, wind, tides and currents will affect the visibility of the water is required. The ideal weather conditions for shooting is when the wind is light and the swell is small as this makes the surface of the ocean calm making it easier to shoot over unders. Conditions when the ocean is rough and turbulent from swell and wind will make shooting much more
difficult.
Calm bodies of water such as sheltered beaches, lagoons, rivers, inlets and protected bays are ideal places to shoot over unders. I also find that shooting in shallow water will give you the best results. It is always good idea to check a location first to see if it is a suitable place to shoot.
Entering the ocean is always a risk so ensure you are a capable swimmer and never go out shooting in dangerous conditions beyond your capability.
The conditions on the ocean can change rapidly so make sure you always check the weather and surf forecasts before you go out shooting.
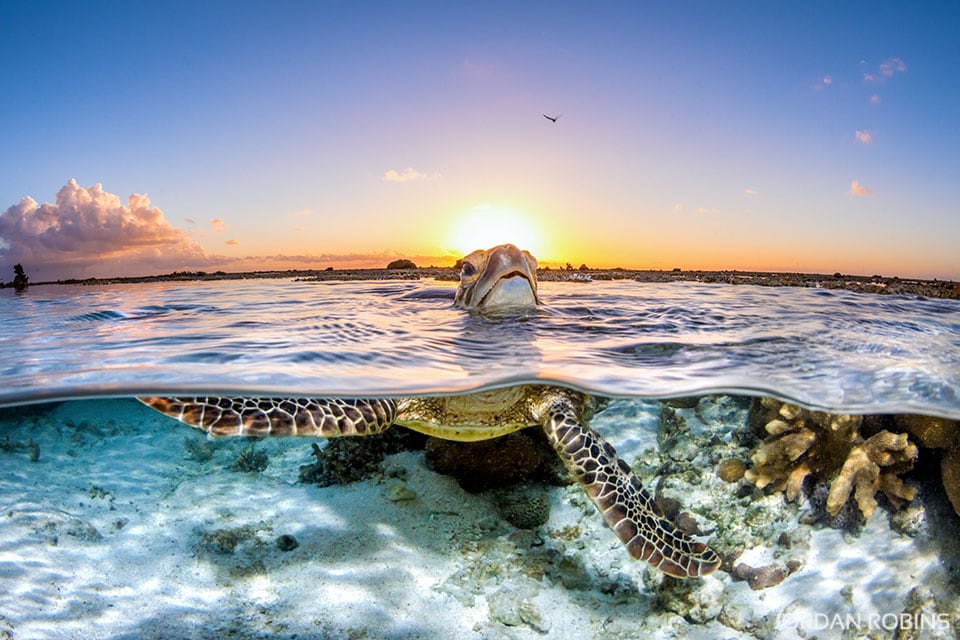
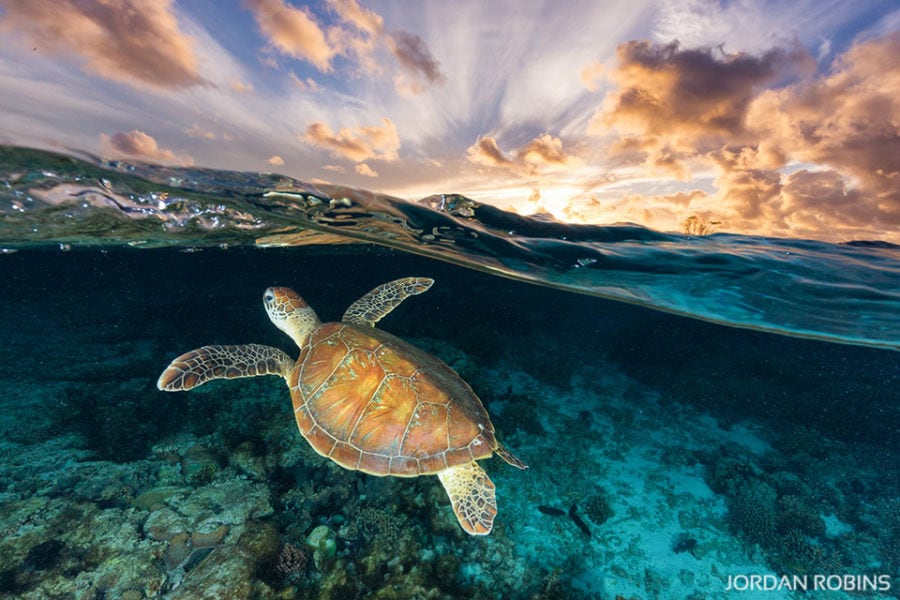
Camera Settings: f/18 | 1/15sec | ISO 320
Shutter Speed
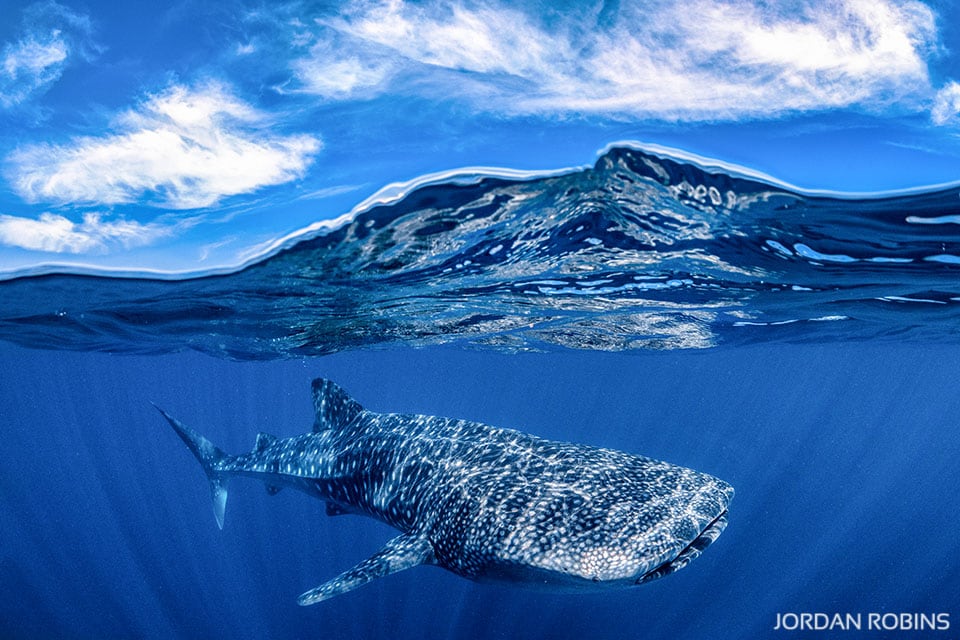
If you are shooting a static scene during the day where there isn’t much movement I would suggest using a shutter speed of 1/125sec or faster. If you are photographing moving subjects where you have wildlife such as a turtle or a stingray use a shutter speed of 1/320sec or faster to freeze the movement. These are just general guides though and you can get as creative as you like by shooting with faster or slower shutter speeds to create different effects.
When shooting with strobes your cameras shutter speed will be restricted by your cameras flash sync speed which may vary depending on the camera you’re shooting with. I shoot with a canon 5d Mk IV which has a sync speed of 1/250sec. This means that when shooting with strobes 1/250sec is the fastest shutter speed I can shoot with. However, I can shoot all shutter speeds slower than this. When I am shooting with strobes on sunrise or sunset I will shoot with a shutter speed between 1/250sec down to 1/60sec.

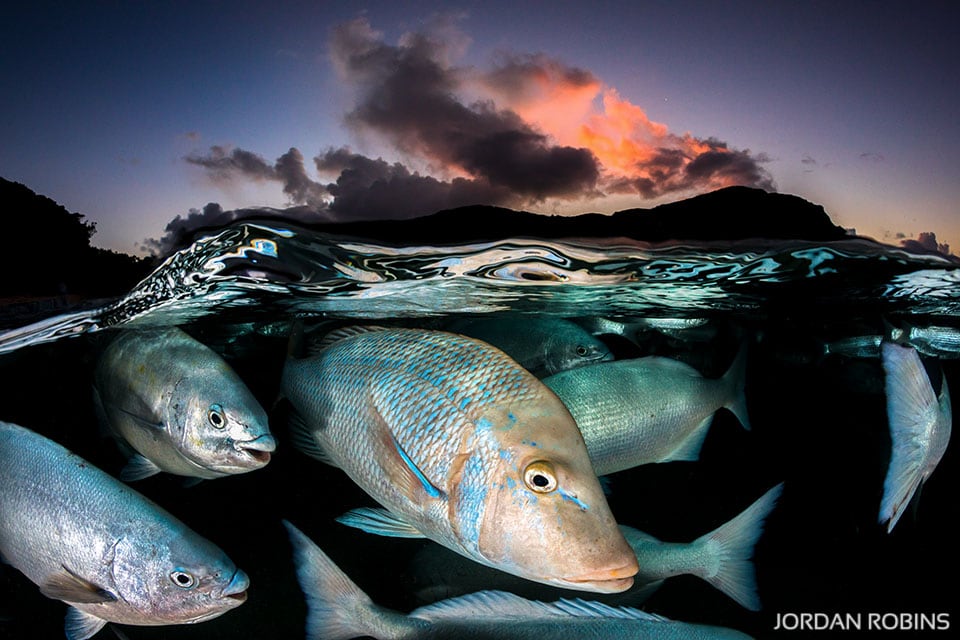
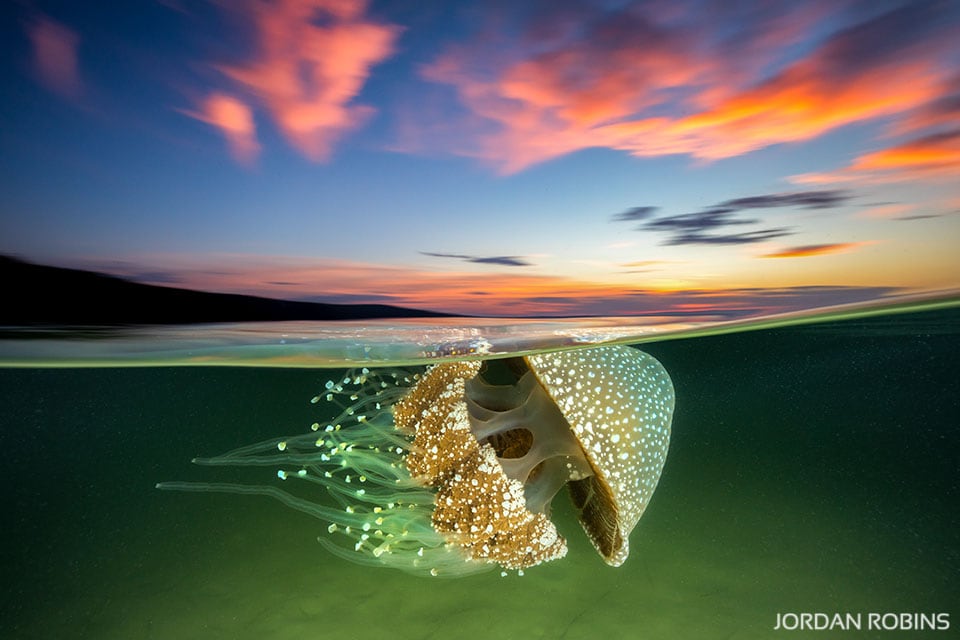
with colour, as the sun sets over Jervis Bay.
Camera settings: f/16 | 1/80sec | ISO 800
ISO
During the day time, I shoot with an ISO of 200-400 depending on the lighting and time of day. If I am shooting a slower shutter speed I will lower the ISO and for shooting a faster shutter speed I will increase the ISO.
When shooting on sunrise or sunset I will use an ISO of 500 up to 1000. You can shoot at higher ISO depending on how your camera handles the noise.
White Balance
When shooting during the daytime I will have my white balance set to daylight. This will give you consistent colour for the images that you will capture during the session. When shooting on sunrise or sunset with strobes I will have my white balance set to automatic and will correct the colour during post processing if need be.
Focusing
When shooting over unders I always shoot with autofocus. I have my focus set up with one autofocus point right in the middle of the focus area. I will
always look though the view finder to make sure I am getting an accurate focus on my subject. When shooting in low light such as on sunrise or sunset I will often focus using the live view on my camera or use a water proof torch and aim the torch on my subject below the water to where I want to focus. When shooting with a fisheye you can have the focus set to infinity, however I find you get the best results shooting with autofocus.
I will always focus on my subject below the water as this gives the best depth of field and leads the eye nicely from the foreground through to the background. The next step now that you’ve got your camera settings all set, you want to submerge your camera and housing below the water. Looking through the viewfinder I will focus on my subject below the water by half pressing on the shutter button. While keeping my finger on the shutter half pressed I will then lift the camera housing half above the water and recompose making sure I have an even balance above and below the water. I find that this is the most difficult part of the process and can take a lot of practising to get it right. The next step is to fire the shutter and there you go you’ve captured an over under image! You also need to be quick as you only have a few seconds to capture the scene before the dreaded water droplets start forming on your dome, which will ruin a shot. You might be a little disappointed at first but like anything practice makes perfect and over
time you will find out what works best for you.

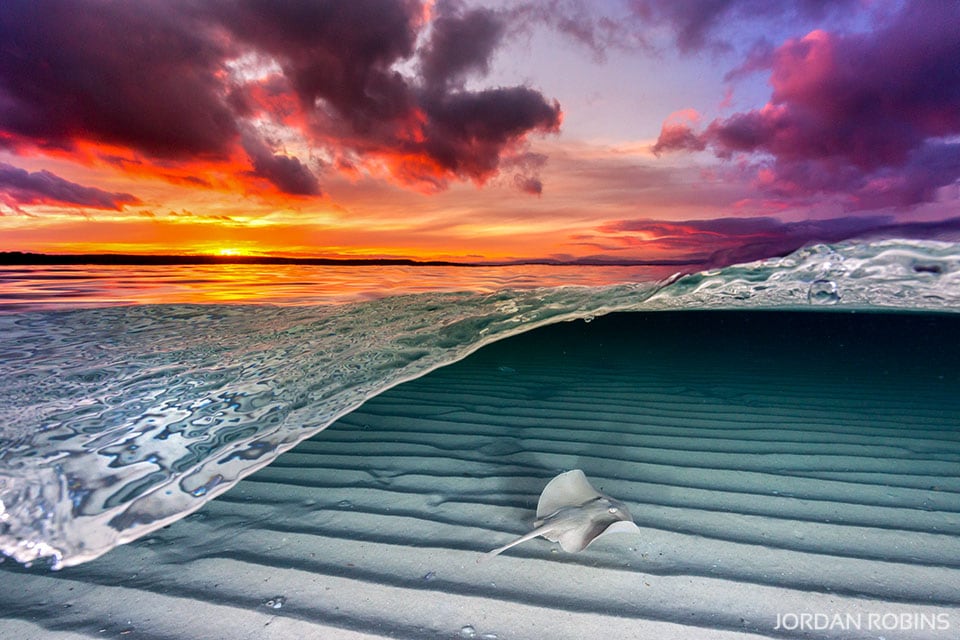
Camera settings: f/13 | 1/400sec | ISO 500
Tips
- When you are shooting over unders I can guarantee that you will always get water droplets form all over the dome. To reduce water droplets forming I will cover the dome in a layer of saliva and leave it to dry over-night. Then when you are out shooting next wash the saliva off so the dome is nice and clear. This will help minimize the water droplets on the dome. Before you take a photo give the housing a quick dunk under the water then take the shot so you don’t have water droplets on the dome.
- After every use (especially in saltwater) make sure you wash your housing in fresh water and let it soak for about 30mins submerged in fresh water to remove any salt build up.
- Always make sure any o rings on your camera housing are lubricated with silicone grease and are free of debris such as sand or hairs.
- Each time before you shoot submerge your camera housing below the water and hold for 10 seconds to make sure you’ve got a water tight seal and no water is leaking into your housing. If you treat your housing well, it will treat you well for many years to come. So, get on out there in the water and get shooting!