How to photograph storms

STORMS: POWERFUL, BEAUTIFUL, and dangerous. Seeing them approach can inspire feelings of wonder, caution, and fear.
When captured in an image, a storm can add a dramatic element to a popular location, or it can stand alone as a showcase of the forces of nature.
Whatever they might convey to an audience, storms are an increasingly popular subject for photographers. But when nature does put on a show, the decisive moment can be fleeting, and as a photographer you must be prepared. This really is the essential ingredient to good storm photography: preparation. It applies to gear selection, location scouting, and weather prediction.
The following tips cover some important areas that photographers should consider when photographing storms in here Australia.
Gear
Camera
For best results, a camera’s settings need to be manually adjusted, so iPhones and point-and-shoot cameras aren’t the best option for storms. A DSLR will work much better as you’ll have control over our settings, which is crucial.
Lens
Although good results can come from zooming in on a storm, you can’t beat a wide-angle lens for capturing the full force of a storm front. You’ll also have more chance of getting lightning in your frame with a wide-angle lens, so this is the best place to start; anything from a 10-20mm lens on a crop-frame camera, or a 14-35mm lens on a full frame camera.
Tripod
Whether photographed in the light of day, or in the dark of night, storms should be photographed with a tripod. This is for one basic reason – lightning. The only reliable way to capture lightning in your image is to increase your exposure time, and for these long exposures we need to use a tripod to prevent image blur and camera shake. Bring the sturdiest one you can.
Tip: Try hanging your camera bag from the base of your tripod to help stabilise it if things start to get wild.
Rain gear
A rain jacket, lens cloth, and towel are essential accessories for storm photography. You and your gear will likely get a few spots of rain, and using a clean lens cloth is much better than using your shirt sleeve. Even if your camera is weather sealed, you should try to protect it as best you can by using an umbrella, towel or even a specially designed waterproof cover.
Settings
Focusing at night
Many people want to have a go at shooting lightning, and the best time to do this is at night as the darkness allows for longer exposures. Focusing in the dark can be particularly challenging and usually involves trial and error, so take some test shots and review your images until you get it right. Always ensure sharpness before composing your shot of the storm.
Tip: For distant storms (e.g. storms out at sea) the focus should be set at infinity and then tweaked back slightly. A good shortcut here is focusing on a bright object far away, like a distant light from a ship or a town.
Shutter speed
This can vary. You can get lucky and capture lightning at most shutter speeds – but you’ll have far more hits with a slow shutter speed. I try to stay between 5 seconds and 10 seconds as a rule. Too much longer and a fast moving front will start to take on a soft or even blurred look. During the daytime these longer exposures are made much easier with filters.
Tip: Try a neutral density filter to slow your shutter speed right down and increase your chances of capturing lightning in the daytime.
Aperture
Shooting at night usually means shooting with your aperture wide open to take in as much light as possible. This works for many low-light subjects, but lightning can be intensely bright, having the potential to blow out all the highlights in your image. I try to avoid this by stopping down my aperture to f/8 or smaller. This also ensures more of the scene is in focus.
Tip: Experiment with your settings to account for the distance of lightning. The closer the lightning, the brighter the scene will become.
A storm cell moves out into the Pacific Ocean. The intense rain inside the core glows from the back-lighting of the Sun. (Image: Will Eades)
Storm prediction
In Australia, our storm season is typically in the more humid months from November to March, with storms building through the morning and hitting mid to late afternoon. But how do we know when and where to find storms? Barometers are great to indicate changing weather conditions, but you can’t beat radar for storm prediction, and checking the radar has never been easier with the advent of smart phones. I personally prefer mobile weather apps, but you can also look up the national radar loop on the Bureau of Meteorology website and select your region to see if a storm is on its way.
Tip: You can learn to predict severe weather without radars and barometers by looking for natural indicators such as large cumulonimbus clouds towering high up into the atmosphere.
Location scouting and timing
Storms present many different photo opportunities at the different stages of their development, but they aren’t always a pleasure to shoot, often bringing strong winds, rain, hail, and (hopefully) lightning. Lightning, though spectacular when captured in an image, is deadly. So apart from striving to be in the right place at the right time when photographing storms, you also need to consider being in the wrong place at the wrong time. When scouting locations for storm photography, the ideal vantage point will offer a wide and unobstructed field of view, like a beach, a field, or an elevated headland. Keep safety in mind and always have an escape plan.
The different stages of a storm can be broken up into the following stages.
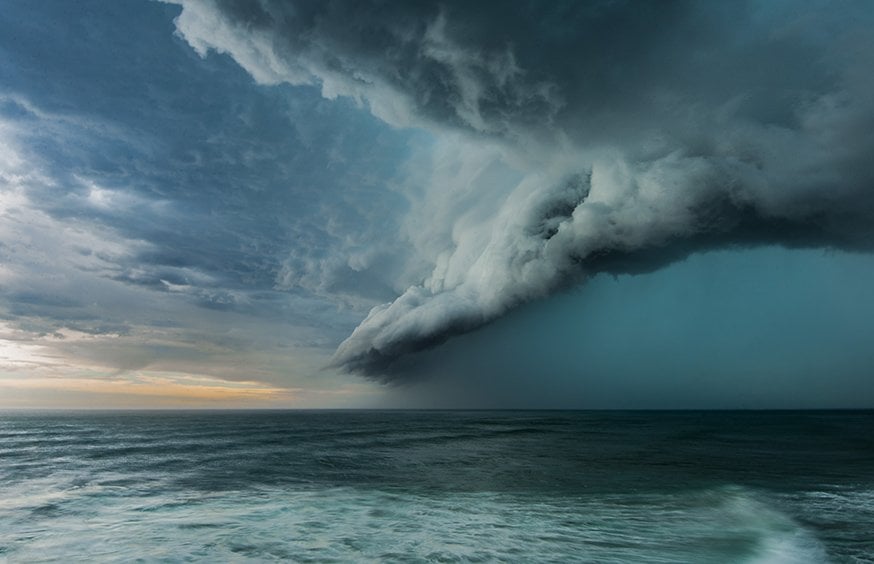
Approaching storm (the front)
Photographs of inbound storm fronts can look fantastic. A menacing shelf cloud or a glowing rain core are powerful images worth capturing. I get my best results with the approaching storm, but the weather can be just as wild prior to the storm hitting as it is during the storm itself, so once again, have an escape plan, i.e. keep your car close by or another form of shelter.
Overhead storm (the danger zone)
No, it’s not as cool as Kenny Loggins makes it sound – people die in severe storms. Cars don’t fare well either. No matter how photogenic a storm might be, when the storm is nearly overhead, I move to cover. At this point many people make the mistake of calling it a day and going home when they should wait it out from the safety of cover and prepare for the final stage of the storm.
Aftermath (the light show)
A distant storm passing out to sea can be even more spectacular than an inbound shelf cloud. Make sure you bring extra batteries, as these light shows can last for hours into the night.
Will Eades is a photographer living on the east coast of Australia. His images have featured in the Australian Geographic journal. You can find more work by Will via his Instagram page and Facebook.
RELATED:
- VIDEO: Sydney storm timelapse
- King tides and wild winds create perfect storm
- How to shoot the Moon
- How to photograph star trails