Photography tips: light painting
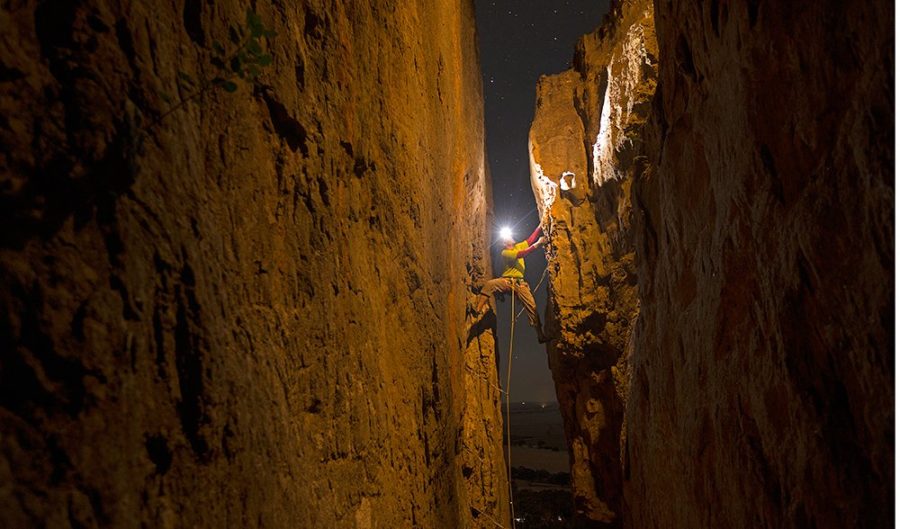
ONE THING IN photography that really brings the kid out in me is light painting. Lately I have been using light painting to expand on my night-time photography. I recently used it, while on assignment, to illuminate the environment of scientists doing night work with tree kangaroos. In the photo here, I used the technique to light a climber ascending the ultra-classic chimney route Agamemnon in Mt Arapiles in Victoria.
The basic concept of light painting is pretty easy to master. You need a dark space that allows you to set a long exposure of at least several seconds with your camera fixed on a tripod. Light painting simply involves exposing the scene by moving a light around, like a torch, while the exposure is being made. The light will create streaks and light signatures in the image.
The next step I’ve taken in light painting is bringing the ever more powerful off-the-shelf headlamps on my backcountry trips. I can use these lights at night like a brush, to illuminate large objects and spaces. I’ve light painted 18m trees, the floor of a desert lakebed and even an entire expedition base camp.
What’s gotten me excited again about light painting are the small and powerful portable headlamps made by Black Diamond, Petzl and Princeton Tec. These manufacturers make headlamps that kick out a bright 200 lumens of light, the brightest is Petzl’s Ultra Rush headlamp that burns at 700 lumens with a 140m reach. All these have power controls and light-beam adjustments that enable me to control the light coverage and intensity.
Light painting tips
The intention in most of my light painting is to naturally light surfaces around a light-emitting object, like the scene around a tent or the surroundings of a person wearing a headlamp. The effect is to enhance and reveal the area around the subject that would otherwise appear as an expanse of darkness.
The longest preset time exposure on my pro-level Nikon is 30 seconds. Using a timer-release accessory, I can make much longer exposures, but because I often include people in my night images, 30 seconds or less helps to reduce the nearly unavoidable blurring due to their movement. This half-minute constraint makes it a race against time to paint and illuminate as much as possible in my camera frame. If I have a big space to light I bring in assistants to help light the scene.
To light paint a big space, as I did when photographing Jordan Webster climbing Agamemnon, I have others helping with the lighting. The person with the main light was attached to a safety rope 9m above the climber.
Adam Tishler, the belayer, directed the second light from below. Jordan was wearing the third light – his headlamp, lighting the route above him. These little headlamps use LEDs that throw a cool, white light. I will usually warm my main lights by taping a CTO warming gel to the front of the light. This light throws a warm, natural glow on the scene. I left Jordan’s light unfiltered so it would contrast with the main light used to paint the walls.
Not everyone is comfortable rock climbing at night, but Jordan was the perfect person for this night climb. It turns out he and Adam are no strangers to night climbing. They live in Los Angeles and their local crag is Joshua Tree National Park.
You can climb in JT most seasons except in summer when the desert cliffs roast under a hot sun, but at night the desert cools quickly. Jordan and Adam routinely climb in JT in the summer from nightfall until 3am and can be back in LA for a sunrise coffee. I was lucky to be camped next to them when I visited Arapiles.
I scouted Agamemnon in daylight, well before Jordan was in position. I did this so I could ascertain the best position for shooting, as well as to consider my photo framing and lens choice. I also took this time to assess the safety issues for the shoot. In my position in the back of the chimney there was rockfall danger to the climbers below so I would need to climb into position carefully.
Also, to prevent a safety line from knocking a rock loose, I used no rope. For my lighting assistant, I rigged a couple of safety ropes on the cliff edge above and also rehearsed the lighting strategy. For the shoot we would be working in pitch-dark, so the more set-up and planning ahead of time the better.
The climbers started up the climb after sunset and it was pitch-dark when Jordan was in climbing position for this photo. Before opening the shutter, I told Jordan how to direct his headlamp, then had him freeze into a position during the exposure.
Light painting: carefully setting up the shot
The exposure for this photo was 25 seconds, the aperture was F4; to make sure I got the light from the stars, I set the ISO to 640. I pre-focused on the climber’s headlamp and kept the focus on manual because in the darkness the auto focus would not work. Using a 16-24mm lens set at 16mm gave me decent depth of field on my Nikon D800 camera. My light person above was using an 80-lumen Petzl headlight filtered with a full CTO orange filter; the warm light matched the beautiful orange sandstone of Mt Arapiles.
During the exposure, I talked my light person through painting the scene: first lighting the climber for a few seconds and then, with slow vertical movements, sweeping the left walls and then the right arête with light.
After the exposure was done everyone could relax while I waited for the camera’s processor to move the image to the camera’s CF card. I then previewed the image to check for overall sharpness, blurring of the climber and the light exposure. In all, I made about eight exposures with the climber being photographed in different sections of the climb.
The technique of light painting is a simple way to expand on your backcountry photography. It takes some time getting used to working in the dark and a willingness to commit to plenty of trial and error.