Photography tips: keeping it real
EVERY SERIOUS PHOTOGRAPHER shooting with a digital camera will have grappled with the question of how far to edit your photos when using Photoshop-type editing tools on the computer.
This topic surfaced recently when a friend and I discussed an article by the successful American landscape photographer Tom Till on the website of the US photo magazine Outdoor Photographer.
In the article Mr Till confessed his “addiction” to oversaturated colours and HDR to pump up the colours in his photography.
HDR stands for high dynamic range and it’s a popular way to expand the limitations of current camera sensors by blending different light exposures to expand a photo’s light and dark ranges.
My friend has noticed the same excessive over-editing (saturation, sharpening, contrast ratios, etc) and use of HDR here in Australia, both in landscape photography and a creep into magazines, and he wondered whether I should be following suit.
My reply was similar to what I have touched on in previous columns in this magazine – I like to keep my photos natural and real. I photograph adventurers and document real pursuits, in real time, so I do the best I can with the light that is available at the moment I shoot the photo.
How to: represent a natural scene in photographs
My non-digital HDR tools I use are fill flash and split-neutral density filters.
If you want to represent a natural scene in your photos, an important step is to recognise digital over-editing. Applied carefully, HDR and Photoshop can produce natural results instead of “radioactive” sunsets and sci-fi ultra-realism.
I expect that some of this extreme photo enhancement may have less to do with a surge in artistic creativity and more to do with photographers appealing to current buying fads for prints or trying to out-gun other shooters.
For other photographers, I am sure the enthusiasm for bright colours and producing something creative is what’s behind the heavy digital hand.
I love technology and the way that digital camera technology is getting closer to capturing what the human eye can see. I suspect, for this reason, in the near future I will use in-camera HDR.
If I do use HDR, it will have to be a version capable of producing, in a single exposure, a natural-looking image that is as close to the original moment as when the photo was taken.
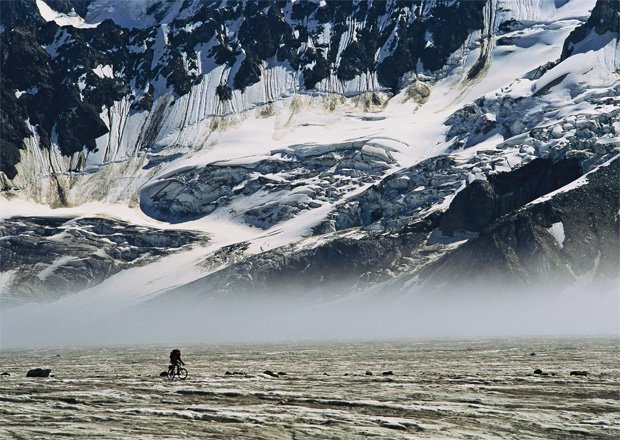
Another argument for keeping a photo real and looking natural is that it lends the work authenticity. As an example, the photo here is from a shoot I did for National Geographic in 1996.
This is one of thousands of photos I made on a seven week, 1250km bike expedition traversing the length of the Alaska Range. This particular image is from an amazing location on the Black Rapids Glacier on the ride up toward the Susitna Glacier.
At the time I took this photo it was to illustrate an expedition story, but now, 15 years later, the same image can be repurposed to illustrate the effects of weather change on glaciers in the Alaska Range because it is a truthful document to that place at that specific time.
It’s anyone’s guess where this photo will find itself in the future.
There is no right or wrong with manipulating your photography. But if you want to show real places, people and events, consider a light touch when using digital photo manipulation.
Top tips for photoshop
Here are a few tips to avoid over-doing the effects on your photo when using Photoshop, Lightroom and other photo programs.
1. The saying “less is more” has a lot of relevance with photo editing.
2. Only make changes on a duplicate photo so you can always go back to the original if your creation goes nuclear.
3. Don’t let the image on the computer monitor be your only guide, if possible compare your editing side by side with the original.
4. Watch the numbers as you change editing effects. In Photoshop, for example, saturation ranges from -100 to 100. When I edit for saturation I may add +4 but don’t go beyond +10. Sharpening is kept between 25-50, etc.
5. Be clear about your objective; is the photo to be documentation, or is it art.
RELATED STORIES