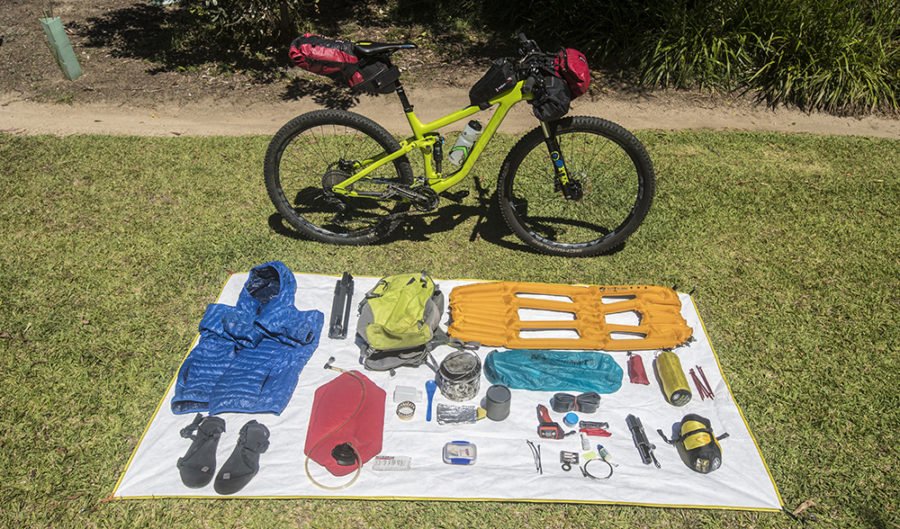
Outdoor tech: bikepacking set-up
THERE ARE FEW hard and fast distinctions between what has traditionally been referred to as cycle touring and what is now being referred to as bikepacking. Both are on bikes, both are overnight, both are challenging and both are loads of fun, but think of them on a spectrum, with touring tending to tar and bikepacking to dirt.
Another key difference lies in their attitudes to gear; bikepacking adopts a philosophy of lightweight minimalism, meaning you can ditch the panniers you’ll see on touring set-ups. It’s not just that panniers get in the way if you’re riding singletrack, it’s that you shouldn’t need them in the first place. It’s not only carrying less gear, but carrying lighter gear.
Now, you mightn’t ordinarily be a gram counter when it comes to your outdoors pursuits. I’m certainly not. When it comes to hiking, for instance, I’ve never obsessed about it at all and have usually always found room to carry a few non-essential luxuries, say, like a kilo of chocolate. But bikepacking is one realm where weight really can affect the fun quotient. Lugging around loads of gear is hard work, especially on the steeper hills you’re likely to find off-road. Moreover, heavy loads simply affect where you can and can’t ride. Trails with rocks, drop-offs and other technical features are all ruled out, and even routes with long distances between water – always a possibility in Oz – become more problematic.
When I rode the Gibb River Road in the Kimberley, for instance, I remember reading online about a guy who’d ridden it the year before; he estimated his bike, food and supplies came to 47kg. And that’s before water. But because he was so loaded, he couldn’t necessarily reach the next waterhole in a day, meaning he had to carry as much as 12 litres. On the other hand, our carbon-fibre gravel grinders and gear and food came to roughly 15kg; we could ride faster, which meant in turn less time between pit stops, which meant carrying less water and food, which meant we could ride faster still. We never had problems reaching the next water.
All that said, though, the most important gear is that which you can get your hands on. Don’t ‘not go’ because you don’t have ‘the right gear’. Adapt what you’ve got, if necessary. A good saddlebag and a midsize pack are essential for most off-road trips, but beyond that everything’s negotiable. Voile ski straps, for instance, can be used to make a DIY handlebar roll if you don’t feel like buying one just yet. Just remember, light is right. And also remember – if you’re trying to justify buying new kit – that much of the gear will be applicable to your other outdoor pursuits. My current set-up for shelter, sleeping and eating (including tent pegs, cup, windshield, fuel to boil a litre of water etc.) comes to just over 1.7kg; all of it doubles for lightweight hiking.
Here’s my current set-up:
Bike
Norco Optic 9.2.. Hopefully you’ve been reading my reviews elsewhere in Australian Geographic Adventure, because this bike rocks, and it’s particularly well-suited to bikepacking. Switch the shock and forks to climb mode and you have a bike that’s virtually rigid and ready for long stints on fire roads. Flip it to descend and it’s ready to play. And yes, even loaded up, it is still possible to play, as long as you’re travelling light enough and you’ve got some well-balanced bags, like the Revelate Designs set-up I’ll mention next. Also, one other great feature the Optic has for bikepacking is that its Race Face Turbine Cinch crankset offers the ability to switch chainrings: a single for everyday riding if that’s what you prefer, and a 2x for bikepacking when you need the lower gears. (norco.com/optic)
Bags
Alaska’s Revelate Designs has been in the bikepacking business longer than pretty much anyone else out there, and its experience shows. I’ve got the Pika saddlebag, the Sweetroll handlebar bag and a Fuel tank that sits on the top tube and offers easy access to snacks. I’ve also got a detachable pocket for the handlebar roll that’s big enough to fit in all the food you might need during the day, plus maps, phone, headlamp etc. It’s brilliant kit, bomber and supremely well balanced. Even on moderately technical singletrack, you don’t notice it’s there. The Pika saddlebag (adjustable from 6-12L) is Revelate’s smallest, but it plays with full-suspension bikes; many saddlebags don’t. On the subject of smaller sizes, when it comes to bags, bigger isn’t better, especially when it comes to technical riding. You actually want to get the smallest volume bags you think you can get away with. One last thing: Revelate ships direct from the US to Oz at reasonable prices, meaning you’re not paying any “Australian surcharge”. (revelatedesigns.com)
Pack
Although not bike-specific, Black Diamond’s Nitro Pack(26L) has served me well for many years. It has a hydration bladder sleeve and can be used for activities other than cycling. It carries a load well, too; I’ve often got mine loaded with 6kg of camera, 4L of water plus other odds and ends.
Shelter
Wherever possible, I ditch the tent; tarps are lighter and extremely versatile. You can use sticks, a camera tripod or your bike as support, or you can just sleep under the stars and pull the tarp over you if some weather comes through (my preferred option). I’ve got Sea to Summit’s Escapist Tarp, the large version (400g), which I pair with the company’s Tyvek groundsheet (172g incl. bag); as a combo, it’s hard to find lighter (seatosummit.com.au). For those trips where weather is more likely to be an issue, I break out my old MSR Hubba Hubba tent. BTW, I use MSR Needle Tent Stakes; 10 weigh less than 100g.
Sleep
Sea to Summit’s Spark series bags are insanely light and extremely comfortable, and the Spark 1, which I use for warmer trips, weighs just 400g. Wow! If the temps are dropping towards freezing, I’ll use my Mountain Hardwear Phantom 0 degree bag. It’s a great bag, but I’ve had it for a decade and it’s now no longer made; Sea to Summit’s Spark 3 is equally good.
For a mat, Klymit’s X-lite ¾ is phenomenal, weighing 180g and rolling down to the size of a Red Bull can. Large portions are cut out to save weight, but the important bits (shoulders, hips, etc.) are all there. It’s so minimalist it won’t be for everyone, and Klymit doesn’t recommend it for side sleepers, but I’m one and I find it comfortable. Klymit also makes a tiny inflatable pillow(61g). I’ve always laughed at camp pillows, but this one is tiny and so much more comfortable than the scrunched up clothes I’ve used for years, it’s a luxury I find space for. (Klymit.com.au)
Eating
I’ve become a convert to cat-can stoves. Made from a tin of Fancy Feast with a row of holes punched in them, they’re super cheap (or free if, like me, you’ve got a cat), super lightweight (6g) and they burn metho, which is far easier to source than canisters or white gas (especially if you’ve just flown in somewhere and had to leave canisters at home). They do have downsides – they don’t simmer or deal well with wind – but mine has boiled a litre of cold water in under 10 minutes. If conditions are more trying, though – say where it’s windy – I’ll reach for my Primus canister stove, or my MSR Dragonfly as a last resort if sourcing canisters is too problematic.
As for my pot, I’m still using an old aluminium billyI bought decades ago, along with a GSK 500ml handle-less cup that doubles as a bowl.
Water
Hydration packs and/or water bottles are fine for everyday riding, but I’ve often found I need to push further without water than either of those options allow. I use a 6L MSR Dromedary Bladder; it even has enough capacity to overnight away from water. I also carry Katadyn Micropur water purifying tablets. Weighing virtually nothing, they can be brought along as insurance if nothing else. You’ve just gotta remember to use them.
First Aid Kit
This is an entire article in itself. Just remember, you’re on a bike, so bring one.
Spares
The list varies a little from trip to trip. In general, I’ve pretty much tried to go as lightweight as possible because tools are one area where weight can add up quickly. Lezyne’s V10 multitool with chainbreakerand Leatherman’s Skeletool with pliers are givens, along with Lezyne’s HV Drive mini pump, which is big enough to quickly fill MTB tyres. One other piece of kit I always carry is a Unior Cassette Tool. Standard cassette tools (necessary to replace a drive-side spoke) can weigh half a kilo. The Unior weighs 12g, and it includes a spoke wrench (unior-bike.com). Speaking of spokes, I always carry spares. Others include zip ties, duct tape(wrapped around the pump), a derailleur hanger, derailleur cable, tyre boots and tubes (even when riding tubeless). Lastly, I’ll often also take out my Birzman Zacoo Macht shock pump; at just 84g, it’s a nice piece of insurance if I need to fiddle with shock pressure.